Friday, November 28, 2014

3 Ways to Teach Kids Who Don't Like Art about da Vinci


My boys and I had a lot of fun learning about Leonardo da Vinci, Renaissance painter, engineer, musician, etc. Our lesson consisted of three simple activities.

Normally, my oldest son groans when I even mention art, but this time I promised him that although we were learning about a legendary artist, we wouldn't be making any of our own. He was game.

To start we read a phenomenal book by Jean Fritz. Leonardo's Horse provides some great background on the artist and then discusses the bronze horse commission he died still dreaming about. It goes on to share how Leonardo's unfinished work became the purpose and wish of Charles Dent, an airline pilot and art enthusiast, who intended to finish da Vinci's work from 500 years earlier. The book was a little advanced for our five year old, but the nine year old was positively enthralled.


No. 1  Backwards Writing
One of the phenomenal facts shared in Fritz's book was that Leonardo could write backwards, from the left side of the page to the right, making it nearly impossible to read without a mirror.

For my oldest son's first activity, I gave him a list of da Vinci facts with the writing inverted left to right. Download the 1-page PDF here.


At first he was confused. "I can't read this. It's in another language!" But upon further study, he realized what it was, so he quickly ran to the mirror.


No. 2  Studying Body Proportion
Leonardo was fascinated with the anatomy of the human body and its proportions. I showed my sons the picture of his Vitruvian Man in Fritz's book. Then I grabbed a measuring tape. I asked my oldest son to hold his arms straight out from his sides. My youngest son measured his brother's arm span from finger tip to finger tip. Now we measured his height. The numbers were the about same!


Another marvel of the human body is that our feet are the same length as the distance between our elbow and our wrist. The boys are pretty flexible and so the measuring tape was not needed to see that in fact, your foot fits perfectly in that space!


No. 3  Chocolate Casting
Since a fair portion of Fritz's book talks about the process of bronze casting, I thought it would be fun for the boys to have their hand at it … but with chocolate. First we filled a small plastic container with brown sugar and packed it down tight. Then we pressed some square candies (sort of like Starburst) into the sugar to make a mold.

Before we inserted them, we added toothpicks to make them easier to remove. When pressing down, we applied pressure to the the square candies (not the toothpick as it would have poked right through) until the tops of the candies were level with the sugar. Lastly, we melted chocolate chips on the stove in a double broiler and poured it into the cavities left by the removed candies.

After a short time in the refrigerator, we removed our chocolate squares and dusted off the extra sugar. Then we popped them in our mouths. YUM.


This was a fun - and delicious - exploration of one of the most phenomenal minds of the Renaissance.  

Wednesday, November 26, 2014

Greek Gods and Goddesses BINGO {free printable]


I couldn't help it. With the Greek gods and goddesses graphics made, it was inevitable that I'd turn them into a BINGO game. My boys love BINGO!


The game I made has six game cards and six pages of call cards to print, cut apart, and shuffle well. Download the 12-page PDF for free here from Google Drive.

We used glass baubles as bingo markers. Cheerios, candies, poker chips, buttons, coins, etc. will work perfectly fine.

To play, put a game piece on the free space. Then simply turn one card over from a face-down pile of the call cards and announce it to all players. If you want to quiz kids, instead of calling out "Dionysus," say "God of Wine & Merrymaking."


For pre-readers, show the call cards so they can look at their game card to find the matching picture. My 5-year-old loved playing this with our 9-year-old and even won by getting five in a row right down the center.

I hope your kids will enjoy this game as much as mine do!


Monday, November 24, 2014

10+ Great Activities to Learn about the Moon (& the Linky!)


As soon as the nights get longer and days get shorter, my boys spend a lot more time noticing the moon. If your kids find the moon fascinating too, here are some of the Internet's best ways to learn about it.


1.  Play a Yahtzee-like game with phases of the moon playing cards. This is one of Relentlessly Fun, Deceptively Educational's free printables.

2.  Make a model to demonstrate how the Earth rotates around the Sun and the Moon goes around the Earth. Preschool Crafts for Kids has the instructions!

3.  Oreos aren't just for dunking. It turns out the sweet sugary treat with its creamy white center makes a great way to craft the moon's phases. Check it out on 123 Homeschool for Me.

4.  Teach kids why there are craters on the moon with a great hands-on science experiment. I Can Teach My Child shows you how.

5.  Get kids active with a game that challenges their knowledge of the moon phases. They'll have a blast jumping from one phases to the next! Learn ~ Play ~ Imagine came up with this brilliant idea for kinesthetic learners!


6.  Learn the phases of the moon with connect the dots pages! This great freebie is available from Kids Activities Blog.

7.  Calculate how far you'd jump on the moon and get active learning all about the moon's lack of gravity. This great idea is at Finding Teachable Moments.

8.  Grab some paper plates and scissors so kids can cut their way to a great phases of the moon craft. Mrs. Parzych's Kindergarten did this incredible activity!

9.  What can you do with a ball and some white and black paint? Make a moon to move around the room and demonstrate the phases! Science Matters is the blog to read to find out more.

10.  One of the best ways to learn about the moon is to read about it. Fantastic Fun and Learning has a book list of moon-themed fiction and non-fiction children's books.

11.  What better way to see how the moon changes than with a model that kids stick their heads through and rotate?!? Stop by Eberopolis for more details!


12.  Make a phases of the moon flip book. You'll find the free printable pages here at Relentlessly Fun, Deceptively Educational.


What are you up to with your kids? We'd love to know!


The After School Linky is cohosted by
Relentlessly Fun, Deceptively Educational

We would love to have you link up your School-Age Post (Ages 5 and up) about your learning week after school including Crafts, Activities, Playtime and Adventures that you are doing to enrich your children's lives after their day at school, home school, or on the weekend!

When linking up, please take a moment to comment on at least one post linked up before yours and grab our after school button to include a link on your post or site! By linking up, you're giving permission for us to share on our After School Pinterest Board and feature an image on our After School Party in the upcoming weeks!

Friday, November 21, 2014

Phases of the Moon Flip Book


Last week we played a great Phases of the Moon card game. This week I reused the graphics for another fun activity. I designed flip book pages, so my son could make his own "animation" of the moon moving through eight phases.


I handed my oldest son three copies of the pages, which he cut out using my personal paper trimmer. Even our 5-year-old got in on the action.

Once the pages were all cut apart, the 9-year-old sorted them into piles. With that completed, he looked at the reference sheet and put the piles in order.

With the cover page first, he began pulling one page from each pile, placing them after the one before.


Next we used the three hole-punch to make holes in the left side of all the pages.

Finally we added a tiny rubberband and paperclip as the binding.


Now came the fun part: flipping the pages to see the moon change! My son thought this was the coolest!


Download the free 2-page PDF of these pages from Google Drive here. And then flip out!

This idea was inspired by an activity in the book Science Crackers Awesome Astronomy by Raman Prinja.

Wednesday, November 19, 2014

Splitting White Light into a Spectrum


It's been awhile since we talked about rainbows, but this simple little activity was a great refresher. Using simple household items, my sons and I split white light into a truly impressive spectrum of colors.


What You Need
1 used music or computer CD
Aluminum foil
Working flashlight
Rubber band
Pushpin
Dark room

Prep
Tear a small piece of foil and cover the flashlight with it. Secure it in place with the rubberband. Using the pushpin, puncture the center of the foil so it has a tiny hole.


Split the Light
Now turn the flashlight on, grab the CD and head into a dark room (we were in the laundry room). Shine the flashlight at the back of the CD, adjusting the angle until you see a straight column of rainbow light.


This stripe of vivid color is the flashlight's spectrum.


How it Works
The tiny groves in the CD when it's laser recorded act as a diffraction grating that split the light.

My boys were so impressed to see their own tiny rainbow! This great activity came from the book Beyond the Solar System.

Monday, November 17, 2014

After School Linky (11-17)


Welcome to the party!


Seeing so many fellow bloggers so eager to raise life-long learners is so inspiring.
Some of my favorite activities from last week's linky follow.


 Games for the Eyes at Mosswood Connections

 Number Line Activity with Place Values at Hands On As We Grow

 STEM Books for Children from The Educators' Spin On It

Woodland Animals Learning Pack at Enchanted Homeschooling Mom


The After School Linky is cohosted by
Relentlessly Fun, Deceptively Educational

We would love to have you link up your School-Age Post (Ages 5 and up) about your learning week after school including Crafts, Activities, Playtime and Adventures that you are doing to enrich your children's lives after their day at school, home school, or on the weekend!

When linking up, please take a moment to comment on at least one post linked up before yours and grab our after school button to include a link on your post or site! By linking up, you're giving permission for us to share on our After School Pinterest Board and feature an image on our After School Party in the upcoming weeks!

Friday, November 14, 2014

Greek Mythology Matching Card Game


My 9-year-old son finds Greek mythology fascinating. I'm not going to lie. I do too.

I've been wanting to create a Greek gods & goddesses card game for at least a year, and I finally worked up the nerve to create my own graphics (so please don't be critical).


Download a free 2-page PDF of the 16 different gods and goddesses game cards here. I printed four of each page, but gauge your child's attention span. A shorter game can be played with two copies of each page.

Once printed on cardstock and cut apart, I shuffled well and we were ready to play.

We played "go fish" with the cards, dealing five cards to each player and putting the remaining cards face down in a big messy pile between us. The goal is to make matches (if you made four copies of each page, a match will consist of four cards). 


"Do you have any Apollo God of Music cards?" If the opponent has one or two or three Apollos, they hand them all over. Then the inquiring player can ask their opponent for another god/goddess card. If their opponent has none, they must draw a card from the pile in the middle. Any matches are set aside.

The player to run out of cards first wins!

Read Want a few great chapter books to read with this activity? 

These are a few of my son's favorites. Ken Jennings' Junior Genius Guide is a non-fiction chapter book with fun facts and illustrations that reminded me of the Origami Yoda illustrations. 

Joan Holub's Heroes in Training series is a wonderful historic fiction account of Greek mythology from the perspective of 10-year-old Olympians; it's wildly creative! My son has read all the books released in the series so far.

Wednesday, November 12, 2014

Free Printable Phases of the Moon Game


When our boys and I were marveling at how big and bright the moon was last week, I got the idea to develop this little game.

It's an adaptation of the game Yahtzee, which our 9-year-old loves to play with his grandma. Download the free PDF from Google Drive here. For two players, you'll want to print 8 copies of the game cards (Print more for additional players). Cut and shuffle.


How to Play
Cut the scorecards apart; you'll need one for each player. The youngest player goes first. He/she draws six cards, turns them over and looks to see what they've got. They'll determine which among the hands listed on the scorecard will give them the most points; for example, if they have
first quarter (3)
first quarter (3)
first quarter (3)
last quarter (7)
new moon (1)
last quarter (7)
they can use the hand as their three of a kind, first quarter (add all the threes), or last quarter (add the two sevens). It's up to them to determine where they write the score.


Play alternates between players. If all the types of hands have been scored and a player has yet to get a hand for sequence of five, they can mark this hand as zero. When the game #1 column is filled with numbers, players will add the total and determine who wins - the player with the highest score.

Have more fun, play a second game!

Variation: My youngest son (age 5) wanted to get in on the action. For him I just provided two sets of the cards, shuffled and arranged them face down so he could play memory.


Read
When we were done playing, my oldest son read The Night Sky to my youngest. This beginning reader provided just the right amount of detail for my youngest and had some more complex facts and ideas on two pages at the back for my oldest. 

Monday, November 10, 2014

After School Linky (11-10)


Welcome to the After School Linky Party!


I love that so many bloggers are interested in advancing their child's learning at home. Here are some of my favorite ideas from last week's link up.


Homeschooling: Free FBI Lapbook at Tina's Dynamic Homeschool Plus.


Art Around the World in 30 Days at Art Curator for Kids.


What is Visual Processing? at Mosswood Connections


The After School Linky is cohosted by
Relentlessly Fun, Deceptively Educational

We would love to have you link up your School-Age Post (Ages 5 and up) about your learning week after school including Crafts, Activities, Playtime and Adventures that you are doing to enrich your children's lives after their day at school, home school, or on the weekend!

When linking up, please take a moment to comment on at least one post linked up before yours and grab our after school button to include a link on your post or site! By linking up, you're giving permission for us to share on our After School Pinterest Board and feature an image on our After School Party in the upcoming weeks!

Wednesday, November 5, 2014

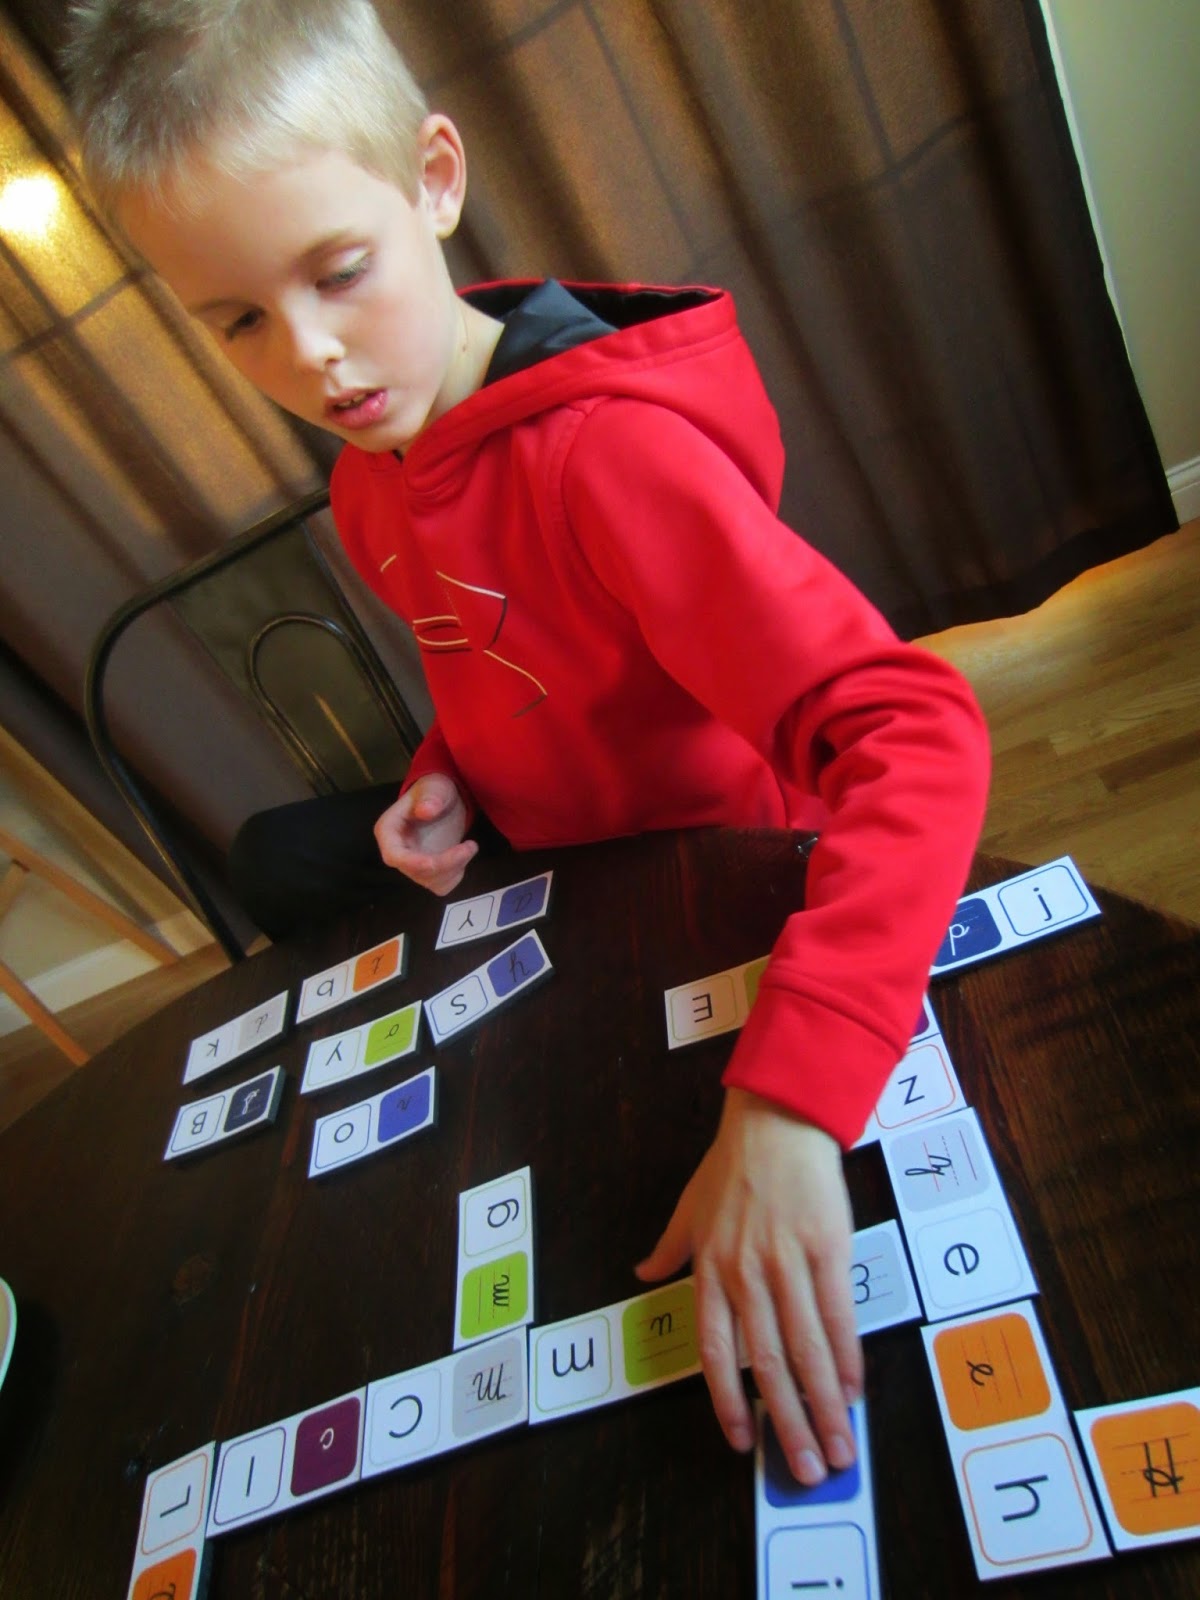
Free Printable Cursive Dominoes


It happened. My son's fourth grade teacher asked the class to write their spelling words in cursive. (gasp) So I asked him, "How'd you do?"

"Bad."

Oh boy. It seems our cursive practice has come a week or two too late. With that in mind, I cranked out these fun dominoes to help engrain the cursive letter formations in my son's brain.


He's also practicing his cursive penmanship with This Reading Mama's FREE Cursive Handwriting Worksheets.

Preparation
I like to make my dominoes nice and thick but it's unnecessary. You can always just laminate and cut apart for extra durability. If you like the look of ours, here's how I did it.

Print the 5-page PDF onto heavyweight cardstock (click here to download the file free from Google Drive).


Apply Foamies glue to the back of the cardstock pages with a foam brush and let dry for 10-15 minutes. I've tried other glues and you have to use a glue specifically for foam. Then apply each page to a sheet of 6mm craft foam.

Using a straight edge, cut the dominoes apart with a craft knife.

Play
We each drew five dominoes from a pile of the upside down dominoes. The youngest player (my 9-year-old son) placed the first domino in front of us. From there we each tried to add another, matching like letters (either manuscript/cursive or upper/lowercase) and butting them up against each other. If we didn't have domino in our hand with a letter that had been played, we kept drawing until we could play.


There were a few times when my son had to stop and ask, "what letter is this?" (I took this as proof that the game was needed.)

Read
My son read a GREAT book after our game. It's a wonderful pairing for this activity, as it's all about cursive. Its history slant makes it perfect for kids that love social studies!

>

Monday, November 3, 2014

After School Linky Party (11-3)


Welcome to the After School Linky Party!


Narrow down my favorites from last week's party to just five? Pshh. Who's counting?!?
Here's TEN of the ideas, blogs, and activities that impressed me.


Must-Try Candy Science Experiments at P is for Preschooler.


Do As I Say, Not As I Do Listening Game at Mosswood Connections.


Sight Word Tic-Tac-Toe at There's Just One Mommy.


Exploring Lines at You Clever Monkey.


Thanksgiving Do-A-Dot Printables at Gift of Curiosity.


What have you been doing with your kid(s)? Please share!

The After School Linky is cohosted by
Relentlessly Fun, Deceptively Educational

We would love to have you link up your School-Age Post (Ages 5 and up) about your learning week after school including Crafts, Activities, Playtime and Adventures that you are doing to enrich your children's lives after their day at school, home school, or on the weekend!

When linking up, please take a moment to comment on at least one post linked up before yours and grab our after school button to include a link on your post or site! By linking up, you're giving permission for us to share on our After School Pinterest Board and feature an image on our After School Party in the upcoming weeks!